订单处理
查看 Markdown运行 为什么是 Dex? 里介绍的订单 Flow。你会启动 Dex,运行示例应用,通过 HTTP 下一个订单,批准发货,再在 Dex Web 里查看这次运行。
1. 启动 Dex
按 本地运行 的说明,用 dexcli dev 启动本地 Dex,并保持运行。
另开一个终端,下载示例代码。下面的命令都在它创建的 dex 目录里运行。
git clone https://github.com/superdurable/dex.git
cd dex
2. Flow、Step 和 RPC
下面的代码就是 为什么是 Dex? 里的 Flow,包括它的 Step、approve 和 describe 两个 RPC,以及它的 Attribute。
把 mock 的支付和发货 API 传给 Flow 的 constructor。不要事后用 setter 设置,也不要从全局变量读取。
每个 Step 都带上用订单 ID 构造的幂等键,订单 ID 也就是 Flow ID。原因见 幂等键。
order-status Attribute 建了索引,所以可以按状态搜索 Flow。它的索引键 keyword1 指定一个搜索槽位。每个带索引的 Attribute 占用一个槽位,所以只有在给很多 Attribute 建索引时,槽位上限才有影响。槽位的说明见 读取和搜索 Attribute。
Ship 的选项在重试用完后把失败转到 Refund。这条路由里的第二个 StepOptions 作用于它转到的 Refund Step,这里是一个较短的重试。
dex:group 和 dex:explanation 注释用来标注 Dex Web 和本文档所画 Flow 图里的每个 Step。它们不改变代码的行为。
order_status = Attribute(
"order-status",
str,
AttributeIndex(IndexType.KEYWORD, "keyword1"),
)
seller_ok = Channel[str]("seller-ok", str)
# dex:group group-id:payment group-label:"Payment"
# dex:explanation text:"Charge the customer for the order."
class Charge(Step[OrderRequest]):
def __init__(self, service: MyDependencyService) -> None:
self.service = service
def get_step_options(self) -> StepOptions:
def execute(self, context: Context, input: OrderRequest) -> StepDecision:
self.service.charge_user(
input.email,
input.customer_id,
input.amount,
idempotency_key=f"charge-{input.order_id}",
)
order_status.set(context, "charged")
return go_to(Ship, input)
# dex:group group-id:shipping group-label:"Shipping"
# dex:explanation text:"Wait for seller approval, remind after 24 hours, then ship the order."
class Ship(Step[OrderRequest]):
def __init__(self, service: MyDependencyService) -> None:
self.service = service
def get_step_options(self) -> StepOptions:
def wait_for(self, context: Context, input: OrderRequest) -> Wait:
return Wait.any_of(
seller_ok.for_one(),
Timer.by_duration(timedelta(hours=24)),
)
def execute(self, context: Context, input: OrderRequest) -> StepDecision:
if context.has_timer_fired():
self.service.send_email(
input.email,
"Reminder: approve shipment",
"Please approve or provide a tracking number.",
)
return go_to(Ship, input)
self.service.ship_item(
input.order_id,
input.test_fail_at_shipping,
idempotency_key=f"ship-{input.order_id}",
)
order_status.set(context, "shipped")
return graceful_complete(f"shipped:{input.order_id}")
# dex:group group-id:refund group-label:"Refund"
# dex:explanation text:"Refund the order when shipping keeps failing."
class Refund(Step[OrderRequest]):
def __init__(self, service: MyDependencyService) -> None:
self.service = service
def execute(self, context: Context, input: OrderRequest) -> StepDecision:
self.service.update_external_system(
f"refund {input.order_id}", idempotency_key=f"refund-{input.order_id}"
)
order_status.set(context, "refunded")
return graceful_complete(f"refunded:{input.order_id}")
class OrderProcessingFlow(Flow[OrderRequest]):
def __init__(self, service: MyDependencyService) -> None:
self.service = service
self.refund = Refund(service)
self.ship = Ship(service)
self.charge = Charge(service)
def get_steps(self) -> StepList[OrderRequest]:
return StepList.start_step(self.charge).other_steps(self.ship, self.refund)
def get_persistence_schema(self) -> PersistenceSchema:
return PersistenceSchema.of(order_status, seller_ok)
@rpc
def approve(self, context: Context, _note: str) -> RPCResult[str]:
seller_ok.publish(context, "approved")
return RPCResult("ok")
@rpc
def describe(self, context: Context) -> RPCResult[str]:
return RPCResult(order_status.get(context))
type OrderProcessingFlow struct {
dex.FlowDefaults
service service.MyService
}
func NewOrderProcessingFlow(applicationService service.MyService) *OrderProcessingFlow {
return &OrderProcessingFlow{service: applicationService}
}
func (flow *OrderProcessingFlow) GetSteps() []dex.StepDef {
return []dex.StepDef{
dex.DefineStartStep(chargeStep{service: flow.service}),
dex.DefineStep(shipStep{service: flow.service}),
dex.DefineStep(refundStep{service: flow.service}),
}
}
func (flow *OrderProcessingFlow) GetRPCs() []dex.RPCDef {
return []dex.RPCDef{
dex.DefineRPC(flow.Approve, nil),
dex.DefineRPC(flow.Describe, nil),
}
}
func (*OrderProcessingFlow) GetPersistenceSchema() dex.PersistenceSchema {
return dex.PersistenceSchema{
Attributes: []dex.AttributeDef{OrderStatus},
Channels: []dex.ChannelDef{SellerOK},
}
}
type chargeStep struct {
dex.StepDefaultsNoWaitFor[OrderRequest]
service service.MyService
}
func (chargeStep) GetStepType() string {
return ChargeStepType
}
func (chargeStep) GetStepOptions() *dex.StepOptions {
}
func (step chargeStep) Execute(
ctx dex.Context,
order OrderRequest,
) (*dex.StepDecision, error) {
step.service.ChargeUserWithIdempotencyKey(order.Email, order.CustomerID, order.Amount, "charge-"+order.OrderID)
if err := OrderStatus.Set(ctx, "charged"); err != nil {
return nil, err
}
return dex.GoTo(shipStep{}, order), nil
}
type shipStep struct {
dex.DefaultStepType
service service.MyService
}
func (shipStep) GetStepType() string {
return ShipStepType
}
func (step shipStep) GetStepOptions() *dex.StepOptions {
}
func (shipStep) WaitFor(
dex.Context,
OrderRequest,
) (*dex.Wait, error) {
return dex.AnyOf(
SellerOK.ForOne(),
dex.Timer(24*time.Hour),
), nil
}
func (step shipStep) Execute(
ctx dex.Context,
order OrderRequest,
) (*dex.StepDecision, error) {
if ctx.HasTimerFired() {
step.service.SendEmail(
order.Email,
"Reminder: approve shipment",
"Please approve or provide a tracking number.",
)
return dex.GoTo(shipStep{}, order), nil
}
if err := step.service.ShipItemWithIdempotencyKey(order.OrderID, order.TestFailAtShipping, "ship-"+order.OrderID); err != nil {
return nil, err
}
if err := OrderStatus.Set(ctx, "shipped"); err != nil {
return nil, err
}
return dex.GracefulComplete("shipped:" + order.OrderID), nil
}
type refundStep struct {
dex.StepDefaultsNoWaitFor[OrderRequest]
service service.MyService
}
func (refundStep) GetStepType() string {
return RefundStepType
}
func (step refundStep) Execute(
ctx dex.Context,
order OrderRequest,
) (*dex.StepDecision, error) {
step.service.UpdateExternalSystemWithIdempotencyKey("refund "+order.OrderID, "refund-"+order.OrderID)
if err := OrderStatus.Set(ctx, "refunded"); err != nil {
return nil, err
}
return dex.GracefulComplete("refunded:" + order.OrderID), nil
}
var (
_ dex.Flow = (*OrderProcessingFlow)(nil)
_ dex.RPC[string, string] = (*OrderProcessingFlow)(nil).Approve
_ dex.RPC[dex.None, string] = (*OrderProcessingFlow)(nil).Describe
)
public class OrderProcessingFlow implements Flow<OrderRequest> {
public static final Attribute<String> orderStatus = Attribute.define(
"order-status",
String.class,
new AttributeIndex(AttributeIndex.Type.KEYWORD, "keyword1"));
public static final Channel<String> sellerOk = Channel.define("seller-ok", String.class);
private final MyDependencyService service;
private final Charge charge;
private final Ship ship;
private final Refund refund;
public OrderProcessingFlow(final MyDependencyService service) {
this.service = service;
this.refund = new Refund(service);
this.ship = new Ship(service);
this.charge = new Charge(service);
}
@Override
public StepList<OrderRequest> getSteps() {
return StepList.startStep(charge).otherSteps(ship, refund);
}
@Override
public PersistenceSchema getPersistenceSchema() {
return PersistenceSchema.of(orderStatus, sellerOk);
}
@RPC
public RPCResult<String> approve(final Context context, final String note) {
sellerOk.publish(context, "approved");
return RPCResult.of("ok");
}
@RPC
public RPCResult<String> describe(final Context context) {
return RPCResult.of(orderStatus.get(context));
}
static final class Charge implements Step<OrderRequest> {
private final MyDependencyService service;
Charge(final MyDependencyService service) {
this.service = service;
}
@Override
public String getStepType() {
return "Charge";
}
@Override
public Class<OrderRequest> getInputType() {
return OrderRequest.class;
}
@Override
public StepOptions getStepOptions() {
}
@Override
public StepDecision execute(final Context context, final OrderRequest order) {
service.chargeUser(order.email, order.customerId, order.amount, "charge-" + order.orderId);
orderStatus.set(context, "charged");
return StepDecision.goTo(Ship.class, order);
}
}
static final class Ship implements Step<OrderRequest> {
private final MyDependencyService service;
Ship(final MyDependencyService service) {
this.service = service;
}
@Override
public String getStepType() {
return "Ship";
}
@Override
public Class<OrderRequest> getInputType() {
return OrderRequest.class;
}
@Override
public StepOptions getStepOptions() {
}
@Override
public Wait waitFor(final Context context, final OrderRequest order) {
return Wait.anyOf(
sellerOk.forOne(),
Timer.byDuration(Duration.ofHours(24)));
}
@Override
public StepDecision execute(final Context context, final OrderRequest order) {
if (context.hasTimerFired()) {
service.sendEmail(
order.email,
"Reminder: approve shipment",
"Please approve or provide a tracking number.");
return StepDecision.goTo(Ship.class, order);
}
service.shipItem(order.orderId, order.testFailAtShipping, "ship-" + order.orderId);
orderStatus.set(context, "shipped");
return StepDecision.gracefulComplete("shipped:" + order.orderId);
}
}
static final class Refund implements Step<OrderRequest> {
private final MyDependencyService service;
Refund(final MyDependencyService service) {
this.service = service;
}
@Override
public String getStepType() {
return "Refund";
}
@Override
public Class<OrderRequest> getInputType() {
return OrderRequest.class;
}
@Override
public StepDecision execute(final Context context, final OrderRequest order) {
service.updateExternalSystem("refund " + order.orderId, "refund-" + order.orderId);
orderStatus.set(context, "refunded");
return StepDecision.gracefulComplete("refunded:" + order.orderId);
}
}
}
例子: examples/java/src/main/java/io/superdurable/dex/products/orderprocessing
const orderStatus = new Attribute("order-status", stringCodec, {
type: IndexType.KEYWORD,
indexKey: "keyword1",
});
const sellerOk = new Channel("seller-ok", stringCodec);
export class OrderProcessingFlow implements Flow<OrderRequest> {
public readonly charge: Charge;
public readonly ship: Ship;
public readonly refund: Refund;
public constructor(public readonly service: MyDependencyService) {
this.refund = new Refund(service);
this.ship = new Ship(service);
this.charge = new Charge(service);
}
public getFlowType(): string {
return "OrderProcessingFlow";
}
public getSteps() {
return StepList.startStep(this.charge).otherSteps(this.ship, this.refund);
}
public getPersistenceSchema(): PersistenceSchema {
return {
attributes: [orderStatus],
channels: [sellerOk],
};
}
@rpc({ inputCodec: stringCodec, outputCodec: stringCodec })
public approve(context: Context, _note: string): RPCResult<string> {
sellerOk.publish(context, "approved");
return { output: "ok" };
}
@rpc({ outputCodec: stringCodec })
public describe(context: Context): RPCResult<string> {
return { output: orderStatus.get(context) };
}
}
class Charge implements Step<OrderRequest> {
public readonly inputCodec = orderRequestCodec;
public constructor(private readonly service: MyDependencyService) {}
public getStepType(): string {
return "Charge";
}
public getStepOptions() {
}
public execute(context: Context, input: OrderRequest): StepDecision {
this.service.chargeUser(input.email, input.customerId, input.amount, `charge-${input.orderId}`);
orderStatus.set(context, "charged");
return goTo(Ship, input);
}
}
class Ship implements Step<OrderRequest> {
public readonly inputCodec = orderRequestCodec;
public constructor(private readonly service: MyDependencyService) {}
public getStepType(): string {
return "Ship";
}
public getStepOptions() {
}
public waitFor(_context: Context, _input: OrderRequest): Wait {
return Wait.anyOf(sellerOk.forOne(), Timer.byDuration(DAY_MS));
}
public execute(context: Context, input: OrderRequest): StepDecision {
if (context.hasTimerFired()) {
this.service.sendEmail(
input.email,
"Reminder: approve shipment",
"Please approve or provide a tracking number.",
);
return goTo(Ship, input);
}
this.service.shipItem(input.orderId, input.testFailAtShipping, `ship-${input.orderId}`);
orderStatus.set(context, "shipped");
return gracefulComplete(`shipped:${input.orderId}`);
}
}
class Refund implements Step<OrderRequest> {
public readonly inputCodec = orderRequestCodec;
public constructor(private readonly service: MyDependencyService) {}
public getStepType(): string {
return "Refund";
}
public execute(context: Context, input: OrderRequest): StepDecision {
this.service.updateExternalSystem(`refund ${input.orderId}`, `refund-${input.orderId}`);
orderStatus.set(context, "refunded");
return gracefulComplete(`refunded:${input.orderId}`);
}
}
#[derive(Clone)]
pub struct OrderProcessingFlow {
charge: Charge,
ship: Ship,
refund: Refund,
}
impl OrderProcessingFlow {
pub fn new(service: MyDependencyService) -> Self {
Self {
charge: Charge {
service: service.clone(),
},
ship: Ship {
service: service.clone(),
},
refund: Refund { service },
}
}
fn approve(&self, context: &mut Context, _note: String) -> HandlerResult<RpcResult<String>> {
SELLER_OK.publish(context, "approved".to_string())?;
Ok(RpcResult::new("ok".to_string()))
}
fn describe(&self, context: &mut Context) -> HandlerResult<RpcResult<String>> {
Ok(RpcResult::new(ORDER_STATUS.get_required(context)?))
}
}
impl Default for OrderProcessingFlow {
fn default() -> Self {
Self::new(MyDependencyService::default())
}
}
impl Flow for OrderProcessingFlow {
type StartInput = OrderRequest;
fn flow_type(&self) -> &'static str {
"OrderProcessingFlow"
}
fn steps(&self) -> StepList<'_, Self::StartInput> {
StepList::start(&self.charge)
.and(&self.ship)
.and(&self.refund)
}
fn persistence(&self) -> PersistenceSchema {
PersistenceSchema::new()
.attribute(&ORDER_STATUS)
.channel(&SELLER_OK)
}
fn rpcs(&self) -> RpcList<Self> {
RpcList::new()
.function(APPROVE_ORDER, Self::approve)
.function_without_input(DESCRIBE_ORDER, Self::describe)
}
}
#[derive(Clone, Default)]
pub struct Charge {
service: MyDependencyService,
}
impl Step for Charge {
type Input = OrderRequest;
fn step_type(&self) -> &'static str {
"ChargeStep"
}
fn options(&self) -> StepOptions<Self::Input> {
}
fn execute(&self, context: &mut Context, input: Self::Input) -> HandlerResult<StepDecision> {
self.service.charge_user_with_idempotency_key(
&input.email,
&input.customer_id,
input.amount,
&format!("charge-{}", input.order_id),
);
context.record_event("charge", input.order_id.clone())?;
ORDER_STATUS.set(context, "charged".to_string())?;
Ok(StepDecision::go_to(&Ship::default(), input))
}
}
#[derive(Clone, Default)]
pub struct Ship {
service: MyDependencyService,
}
impl Step for Ship {
type Input = OrderRequest;
fn step_type(&self) -> &'static str {
"ShipStep"
}
fn options(&self) -> StepOptions<Self::Input> {
}
fn wait_for(&self, _context: &mut Context, _input: Self::Input) -> HandlerResult<Wait> {
Ok(Wait::any_of([
SELLER_OK.for_one(),
Timer::by_duration(Duration::from_secs(24 * 60 * 60)),
]))
}
fn execute(&self, context: &mut Context, input: Self::Input) -> HandlerResult<StepDecision> {
if context.has_any_timer_fired() {
self.service.send_email(
&input.email,
"Reminder: approve shipment",
"Please approve or provide a tracking number.",
);
context.record_event("shipment-reminder", input.order_id.clone())?;
return Ok(StepDecision::go_to(&Ship::default(), input));
}
self.service.ship_item_with_idempotency_key(
&input.order_id,
input.test_fail_at_shipping,
&format!("ship-{}", input.order_id),
)?;
context.record_event("ship", input.order_id.clone())?;
ORDER_STATUS.set(context, "shipped".to_string())?;
Ok(StepDecision::graceful_complete(format!(
"shipped:{}",
input.order_id
)))
}
}
#[derive(Clone, Default)]
pub struct Refund {
service: MyDependencyService,
}
impl Step for Refund {
type Input = OrderRequest;
fn step_type(&self) -> &'static str {
"RefundStep"
}
fn options(&self) -> StepOptions<Self::Input> {
}
fn execute(&self, context: &mut Context, input: Self::Input) -> HandlerResult<StepDecision> {
self.service.update_external_system_with_idempotency_key(
&format!("refund {}", input.order_id),
&format!("refund-{}", input.order_id),
);
context.record_event("refund", input.order_id.clone())?;
ORDER_STATUS.set(context, "refunded".to_string())?;
Ok(StepDecision::graceful_complete(format!(
"refunded:{}",
input.order_id
)))
}
}
static ORDER_STATUS: LazyLock<Attribute<String>> = LazyLock::new(|| {
Attribute::new("order-status").indexed(AttributeIndex::keyword().with_key("keyword1"))
});
static SELLER_OK: LazyLock<Channel<String>> = LazyLock::new(|| Channel::new("seller-ok"));
3. Worker 和 Client
创建连接到 dexcli(127.0.0.1:8801)的 Registry、Worker 和 Client。用 mock API service 构造 Flow,再注册它。示例应用把所有示例 Flow 注册在同一个 Registry 里,所以下面的代码片段尽量只展示这条 Flow 相关的行。Python 示例应用运行在异步 Web 框架上,所以使用 AsyncWorker 和 AsyncClient。快速开始 用的是同步的 Worker 和 Client,两者的工作方式相同。
Worker 主动连到 dexcli 接收任务,所以不需要开放入站端口。容量、就绪状态和生产环境配置见英文的 Workers and the task queue。
        service = MyDependencyService()

        self.order_processing = OrderProcessingFlow(service)
        self.registry = Registry(tuple(flows), allow_async_handlers=True)
        config.blob_cache_dir.mkdir(parents=True, exist_ok=True)
        self.blob_cache = open_blob_cache(
            BlobCacheConfig(str(config.blob_cache_dir), 1 << 30)
        )
        self.worker = AsyncWorker(
            self.registry,
            self.blob_cache,
            WorkerOptions(server_address=config.server_address),
        )
        self._client = AsyncClient(
            self.registry,
            self.blob_cache,
            ClientOptions(server_address=config.server_address),
        )
	var client *sdk.Client
	flows := registry.New(service.NewMyService(), func() *sdk.Client { return client })
	flowRegistry, err := sdk.NewRegistry(flows)
	if err != nil {
		return nil, errors.Join(fmt.Errorf("register example flows: %w", err), cache.Close())
	}
	worker, err := sdk.NewWorker(flowRegistry, cache, sdk.WorkerOptions{
		FlowServiceAddress: os.Getenv("DEX_FLOW_SERVICE_ADDRESS"),
	})
	if err != nil {
		return nil, errors.Join(err, cache.Close())
	}
	client, err = sdk.NewClient(flowRegistry, cache, sdk.ClientOptions{
		FlowServiceAddress: os.Getenv("DEX_FLOW_SERVICE_ADDRESS"),
	})
orderprocessing.RegisterRoutes(router, client, registry.OrderProcessing)
    @Bean(destroyMethod = "close")
    public Worker worker(
            final Registry registry,
            final BlobCache blobCache,
            @Value("${dex.server-address}") final String serverAddress) {
        return new Worker(registry, blobCache, WorkerOptions.newBuilder()
                .serverAddress(serverAddress)
                .build());
    }

    @Bean(destroyMethod = "close")
    public Client client(
            final Registry registry,
            final BlobCache blobCache,
            @Value("${dex.server-address}") final String serverAddress) {
        return new Client(registry, blobCache, new ClientOptions(serverAddress));
    }
例子: examples/java/src/main/java/io/superdurable/dex/products/orderprocessing
export const orderProcessingFlow = new OrderProcessingFlow(new MyDependencyService());
  const registry = createExampleRegistry();
  const blobCache = openBlobCache({
    directory: env.blobCacheDir,
    maxBytes: 1 << 30,
  });
  const worker = await startExampleWorker(registry, blobCache, env.serverAddress);
  const client = new Client(registry, blobCache, {
    serverAddress: env.serverAddress,
  });
  setClient(client);
app.use("/products/order-processing", createOrderProcessingRouter(client, orderProcessingFlow));
    let client = Arc::new(Client::try_new(
        create_example_registry(Arc::clone(&polling_jobs))?,
        Arc::clone(&cache),
        ClientOptions::new().server_address(config.server_address.clone()),
    )?);
    let worker = Arc::new(Worker::try_new(
        create_worker_registry(Arc::clone(&client), Arc::clone(&polling_jobs))?,
        Arc::clone(&cache),
        WorkerOptions::new().server_address(&config.server_address),
    )?);
    let running_worker = Arc::clone(&worker);
    let worker_handle = thread::spawn(move || running_worker.start());
    if let Err(error) = wait_for_pull_registration(&worker).await {
        worker.stop();
        if let Err(stop_error) = worker_handle.join().expect("worker thread panicked") {
            eprintln!("pull Worker stopped with an error: {stop_error}");
        }
        return Err(error);
    }

    let router = build_router(client, polling_jobs);
4. Controller
HTTP controller 有三个 handler:
- start 启动 Flow,再用 Client 的 wait-for-Step-completion API 等 Charge Step 完成。
- approve 调用 approve RPC,由它把审批消息发到卖家 Channel。
- describe 调用 describe RPC,由它读取 order-status。
controller 从 constructor 或 factory 参数拿到 Client 和 Flow。
    @blueprint.get("/start")
    async def start() -> Response:
        flow_id = new_flow_id("order-processing")
        request = OrderRequest(
            flow_id,
            "buyer@example.com",
            "customer-1",
            42,
            optional_query("testFailAtShipping", "") == "true",
        )
        run_id = await app_state.client.start_flow(
            app_state.order_processing,
            flow_id,
            request,
            start_options(),
        )
        await app_state.client.wait_for_step_completion(
            flow_id,
            CHARGE_STEP,
            WaitForStepCompletionOptions(),
        )
        return started_flow(flow_id, run_id)

    @blueprint.get("/approve")
    async def approve() -> Response:
        output = await app_state.client.invoke_rpc(
            app_state.order_processing.approve,
            _required_flow_id(),
            optional_query("notes", ""),
        )
        return jsonify(output)

    @blueprint.get("/describe")
    async def describe() -> Response:
        flow_id = _required_flow_id()
        status = await app_state.client.invoke_rpc(
            app_state.order_processing.describe,
            flow_id,
        )
        return jsonify({"flowID": flow_id, "status": status})

    return blueprint


def _required_flow_id() -> str:
    """Reads the Flow ID from flowId, or from its alias workflowId."""
    return optional_query("workflowId", "") or required_query("flowId")
func RegisterRoutes(router gin.IRouter, client *sdk.Client, flow *OrderProcessingFlow) {
controller := &controller{client: client, flow: flow}
group := router.Group("/products/order-processing")
group.GET("/start", controller.start)
group.GET("/approve", controller.approve)
group.GET("/describe", controller.describe)
}
func (controller *controller) start(request *gin.Context) {
flowID := httputil.NewFlowID("order-processing")
input := OrderRequest{
OrderID: flowID,
Email: "buyer@example.com",
CustomerID: "customer-1",
Amount: 42,
TestFailAtShipping: request.Query("testFailAtShipping") == "true",
}
runID, err := controller.client.StartFlow(
request.Request.Context(),
controller.flow,
flowID,
input,
sdk.StartFlowOptions{},
)
if err != nil {
httputil.Respond(request, nil, err)
return
}
waitContext, cancelWait := context.WithTimeout(request.Request.Context(), 5*time.Minute)
defer cancelWait()
@RestController
@RequestMapping("/products/order-processing")
public class OrderProcessingController {
private final Client client;
private final OrderProcessingFlow flow;
public OrderProcessingController(
final Client client,
final OrderProcessingFlow flow) {
this.client = client;
this.flow = flow;
}
@GetMapping("/start")
public ResponseEntity<Map<String, String>> start(
@RequestParam(defaultValue = "false") final boolean testFailAtShipping) {
final String flowId = "order-processing-" + System.nanoTime();
final OrderRequest request = new OrderRequest(
flowId,
"buyer@example.com",
"customer-1",
42,
testFailAtShipping);
final String runId = client.startFlow(flow, flowId, request, ExampleFlows.startOptions());
client.waitForStepCompletion(
flowId,
StepExecutionId.of("Charge"),
WaitForStepCompletionOptions.newBuilder().build());
final Map<String, String> response = new LinkedHashMap<String, String>();
response.put("flowID", flowId);
例子: examples/java/src/main/java/io/superdurable/dex/products/orderprocessing
export function createOrderProcessingRouter(
  client: Client,
  flow: OrderProcessingFlow,
): Router {
  const router = Router();

  router.get("/start", async (request, response) => {
    const flowId = `order-processing-${process.hrtime.bigint()}`;
    const input: OrderRequest = {
      orderId: flowId,
      email: "buyer@example.com",
      customerId: "customer-1",
      amount: 42,
      testFailAtShipping: String(request.query.testFailAtShipping ?? "") === "true",
    };
    const runId = await client.startFlow(flow, flowId, input, startOptions());
    await client.waitForStepCompletion(
      flowId,
      StepExecutionId.of("Charge"),
      {},
    );
    response.json({ flowID: flowId, runID: runId });
  });

  router.get("/approve", async (request, response) => {
    const flowId = flowIdFromQuery(request.query);
    const notes = String(request.query.notes ?? "");
    const output = await client.invokeRPC(flow.approve, flowId, notes);
    response.json(output);
  });

  router.get("/describe", async (request, response) => {
    const flowId = flowIdFromQuery(request.query);
    const status = await client.invokeRPC(flow.describe, flowId);
    response.json({ flowID: flowId, status });
  });

  return router;
}

/** Reads the Flow ID from flowId, or from its alias workflowId. */
function flowIdFromQuery(query: Record<string, unknown>): string {
  return String(query.workflowId ?? query.flowId ?? "");
}
pub fn mount(client: SharedClient, flow: OrderProcessingFlow) -> Router {
Router::new()
.route("/products/order-processing/start", get(start))
.route("/products/order-processing/approve", get(approve))
.route("/products/order-processing/describe", get(describe))
.with_state(OrderProcessingState { client, flow })
}
async fn start(
State(state): State<OrderProcessingState>,
Query(query): Query<StartQuery>,
) -> impl IntoResponse {
let OrderProcessingState { client, flow } = state;
match run_blocking(move || {
let flow_id = new_flow_id("order-processing");
let input = OrderRequest {
order_id: flow_id.clone(),
email: "buyer@example.com".into(),
customer_id: "customer-1".into(),
amount: 42,
test_fail_at_shipping: query.test_fail_at_shipping,
};
let run_id = client.start_flow(&flow, &flow_id, input)?;
client.wait_for_step_completion(
&flow_id,
StepExecutionId::of(&Charge::default()),
WaitForStepCompletionOptions::new(),
)?;
Ok(StartResponse { flow_id, run_id })
}) {
5. 运行
保持 dexcli dev 在跑。在第二个终端的 dex 目录里,安装并启动对应语言的示例应用:
cd examples/python
uv sync --locked
uv run --frozen python main.py
cd examples/go
make bins
./dex-samples
cd examples/java
./gradlew bootRun
cd examples/typescript
npm install
npm start
cd examples/rust
cargo run --locked
示例应用在端口 8080 上运行一个 Worker 和一个 HTTP controller。
在第三个终端里启动一笔订单,打开 Dex Web,再批准发货:
curl -s 'http://127.0.0.1:8080/products/order-processing/start'
从 JSON 里复制 flowID。打开 http://127.0.0.1:8802,找到这条 Flow,打开详情。Ship Step 在等待。
curl -s "http://127.0.0.1:8080/products/order-processing/approve?flowId=FLOW_ID"
把 FLOW_ID 换成刚才复制的 flowID。这条 Flow 会发货并完成。
试试退款路径
下一个发货总会失败的订单:
curl -s 'http://127.0.0.1:8080/products/order-processing/start?testFailAtShipping=true'
像上面一样批准它。Ship Step 失败后会重试 3 秒。之后 Flow 进入 Refund Step,给买家退款并完成 Flow。读取它的状态:
curl -s "http://127.0.0.1:8080/products/order-processing/describe?flowId=FLOW_ID"
状态是 refunded。在 Dex Web 里,Execution graph 显示 Charge、Ship,然后是 Refund。
6. Dex Web
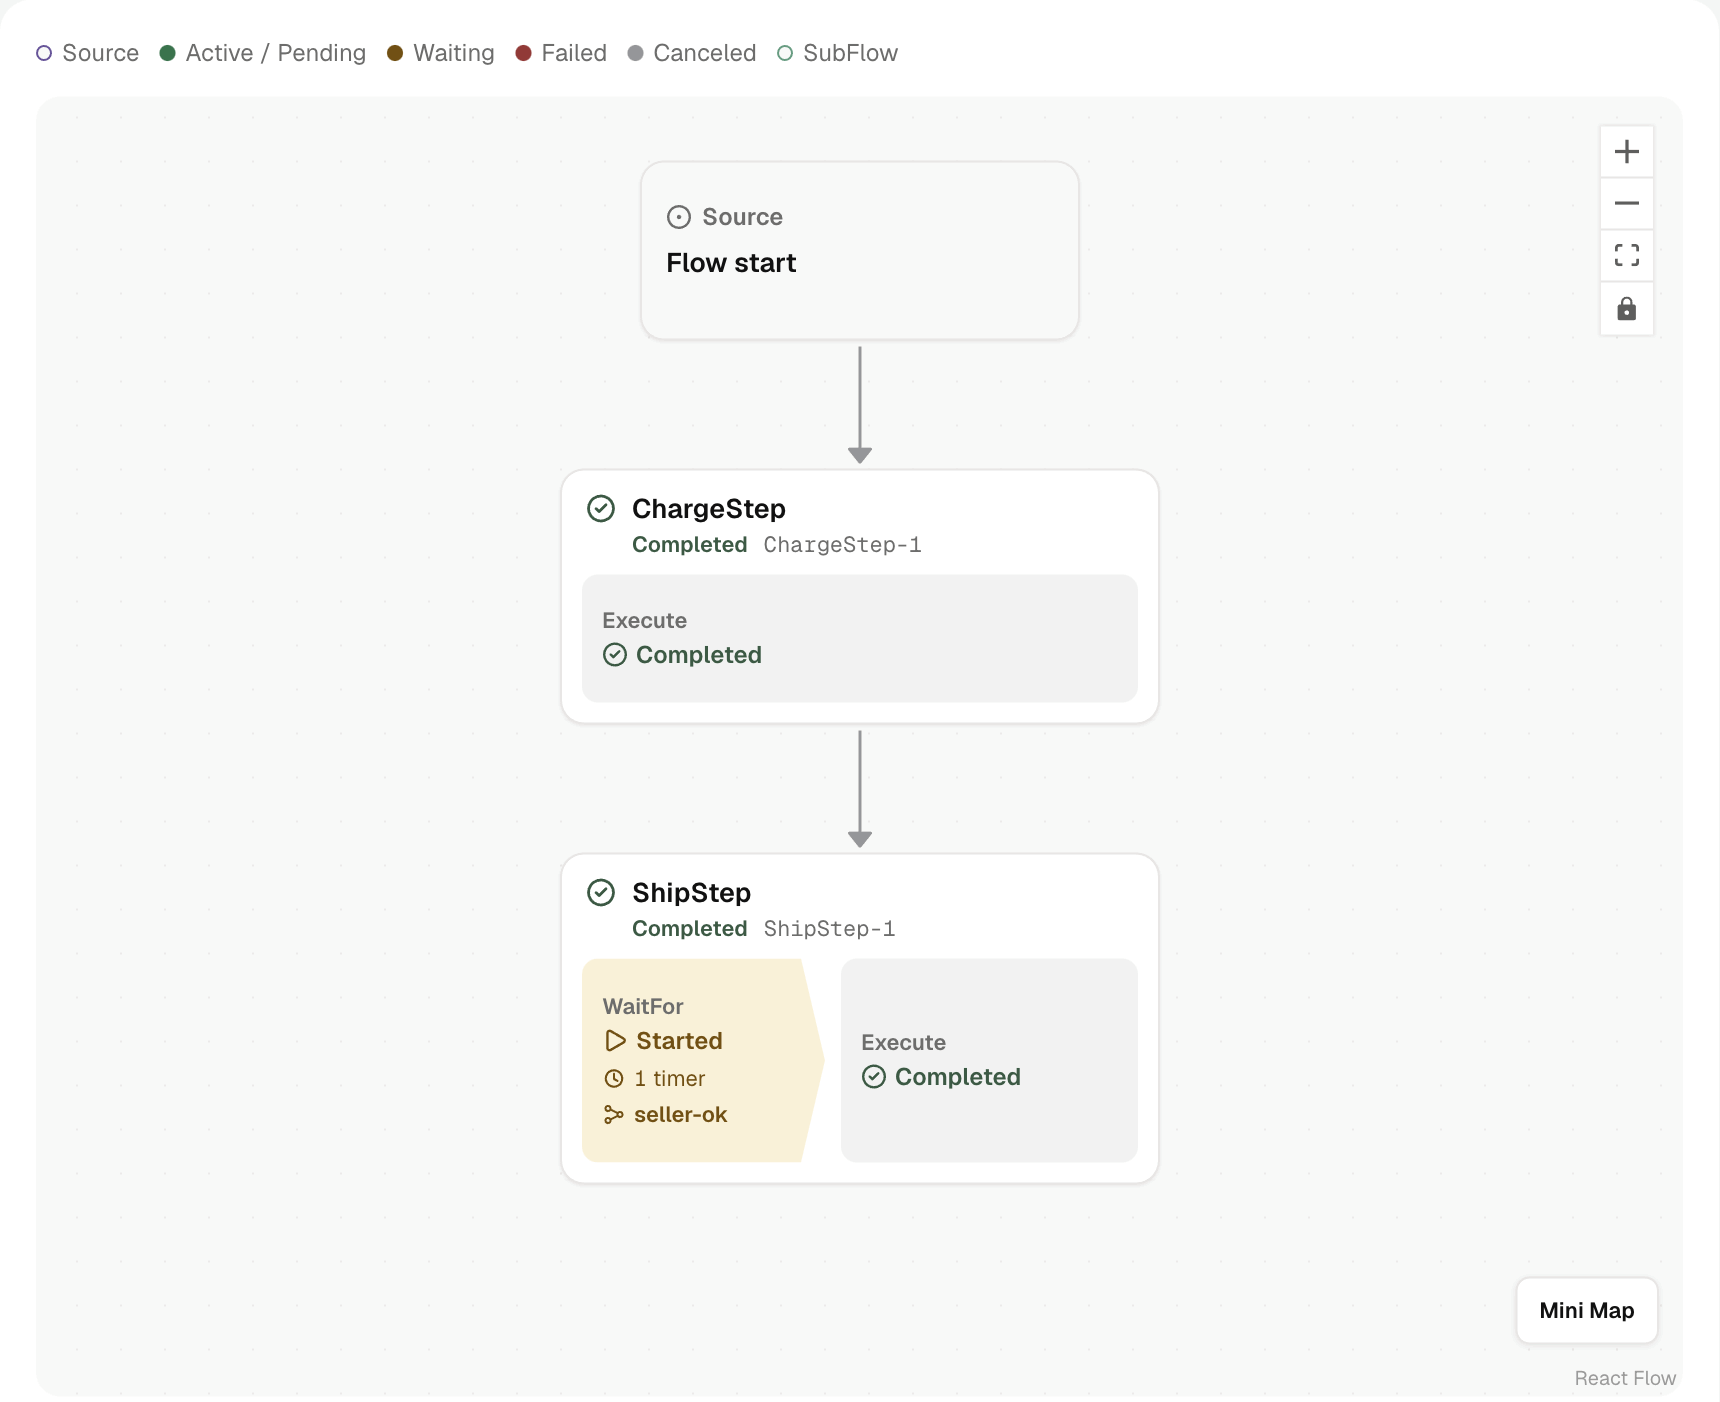
批准订单后,在 Dex Web 里打开这条 Flow。Execution graph 显示先 Charge、后 Ship:
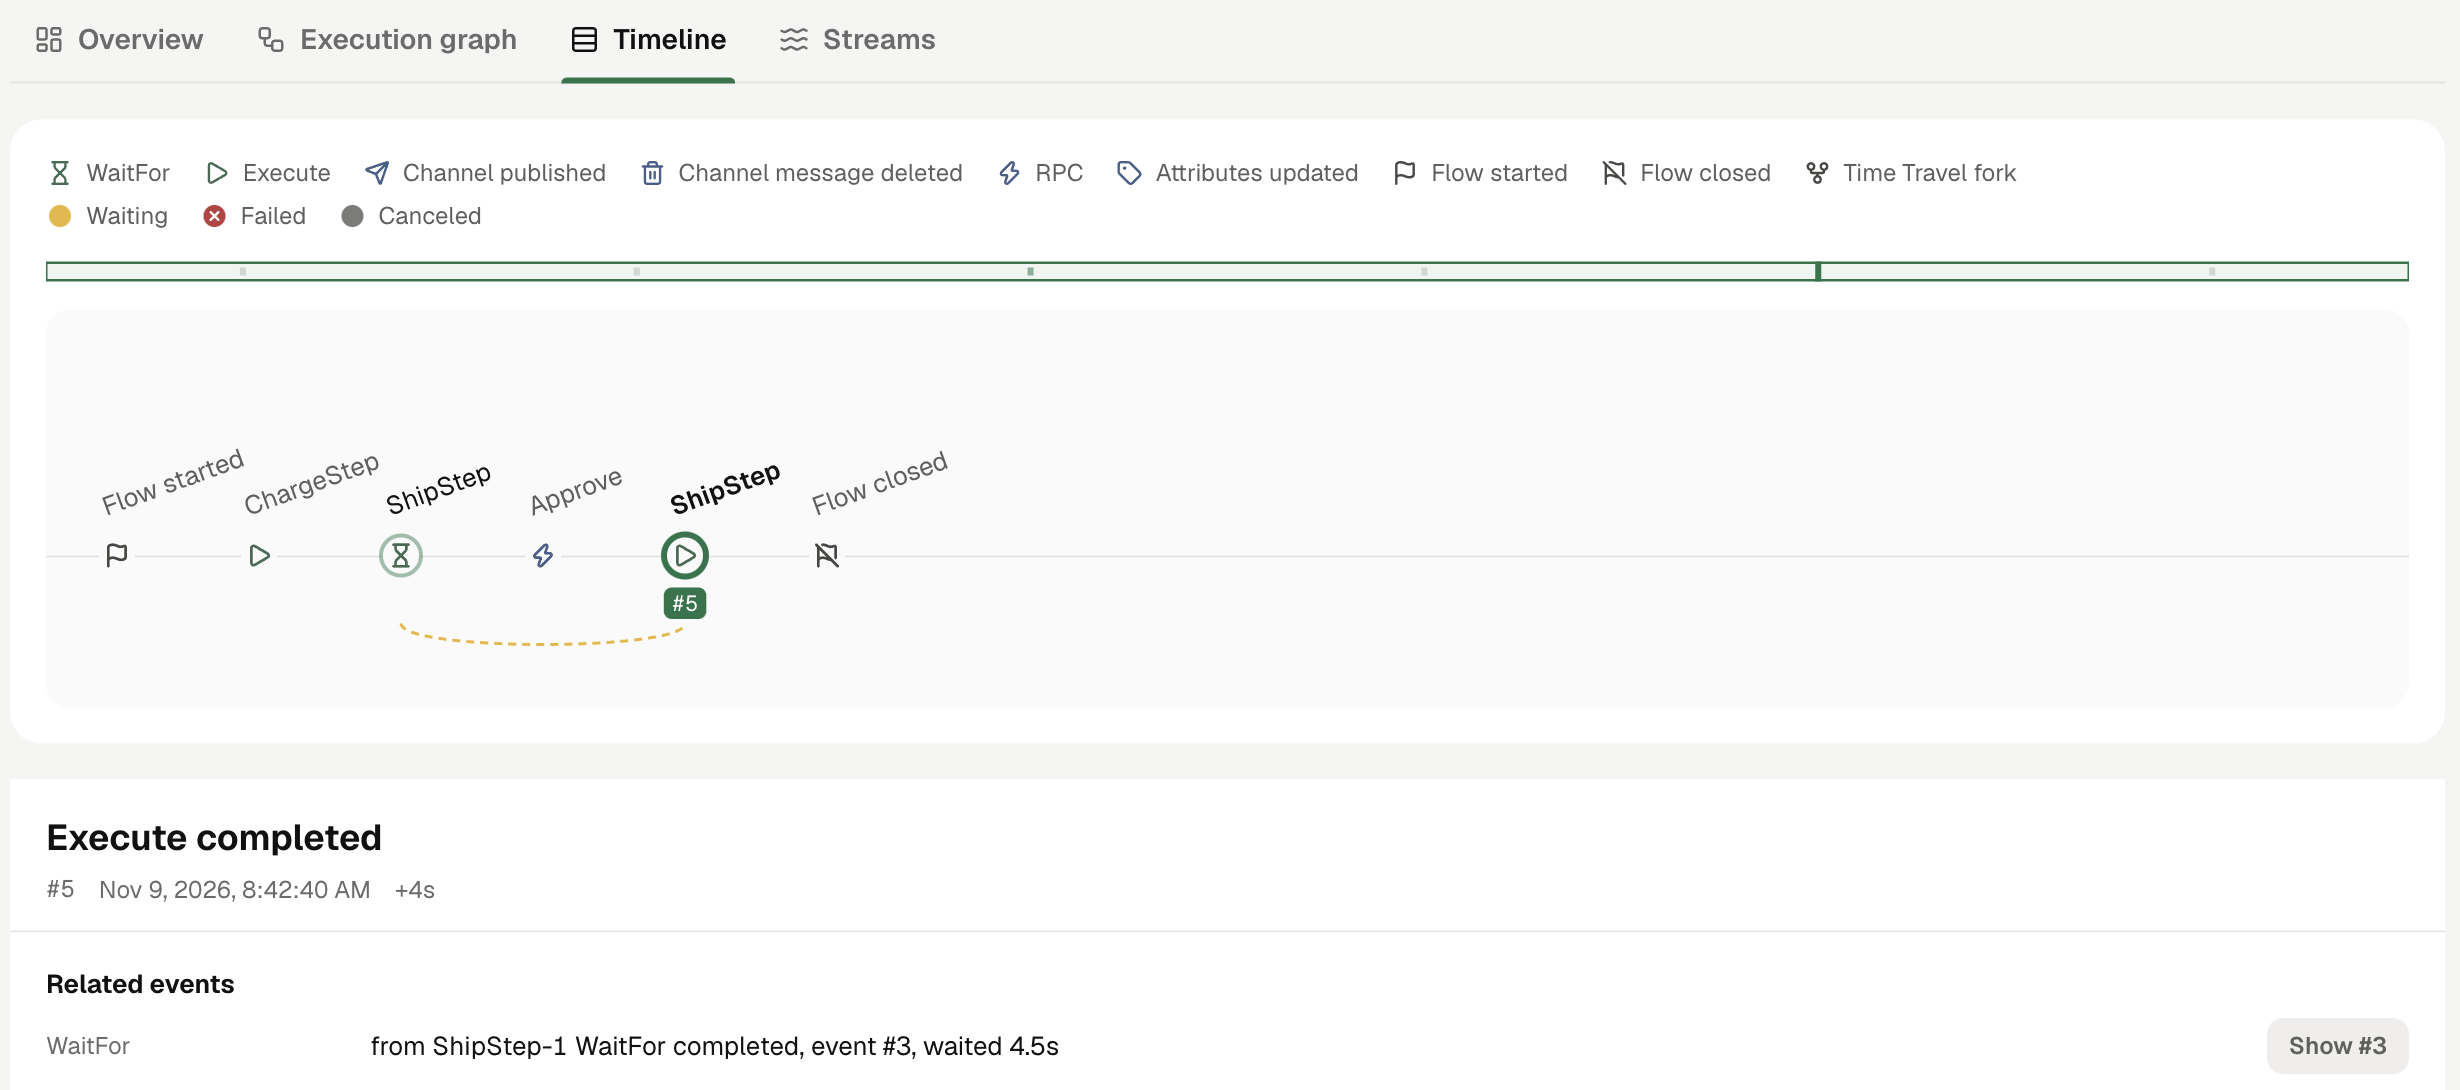
Timeline 标签页从左到右显示同一次 run 的事件。选中一个事件,就能在 Timeline 下方读取它的输入和输出:
下一步
- 概念:这个示例用到的 Flow、Step、Channel、Timer 等基本组成部分。
- 你的应用:怎样在你自己的服务里加入 Worker 和 Client。
- Dex vs. 数据库:用数据库和队列实现的同一个订单流程。
- 产品示例:更多完整示例,包括两个 AI Agent。